Monday, July 7, 2025

Desert Wadi Part One

Hello There! I wanted to add a desert wadi to my desert terrain and have been planning how I would do this for a while.


I made the base and sides in the same way as the modular terrain, here. I was able to use many styrene off cuts from the rubbish bag, that I had kept., 'just in case'!

I had drawn out the sides of the wadi on the plywood base and filled the sides out with the styrene off cuts.


At first I was planning  to score the face of the rocks, like here. But I had a large amount of Woodland Scenics plaster rock faces made and a large bag of plaster left over from another craft project.

I cast a number of rocks and then started to fit the most suitable parts in place. There would be some overhang, where the rocks would be taller than the styrene but I can make the height difference up later.

I included a slope on one side to aid access to the bottom of the Wadi and have plans to add a few more sections to this scenery later.

I made it all fit together and then will glue up in the next part.


Mediterranean Church Part One

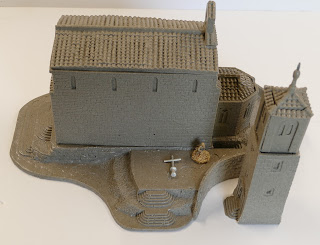
Hello there! Along with the other scenic items I am working on, I have taken out of storage the Shellhole Scenics Mediterranean church that I bought during the 1990's!


As you can see it is massive. That is a 20mm figure on it.

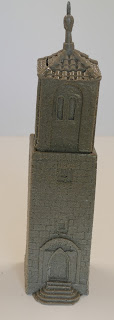
It comes complete with a separate tower which I shall keep with the church.


There are some small damages which have accumulated over the years as it has endured a number of house moves, as have I.

The main building lifts off and has a subfloor in the base and a separate pulpit and second floor. I do not normally keep lift off roofs as they can easily get damaged and putting figures inside model building can 'give the game away' so I keep such figures off the table until revealed of spotted.

Also, unavoidable with such a large resin casting, the sides have bulged out a bit. I hope to take this into consideration while upgrading this building.


The separate tower is in three parts and again had a lift off roof. It also has interior detail.

I was planning to keep the tower in one piece and on the same base as the church.

Like the church it has to have the windows hollowed out.


As the top of the walls bowed out past the edges of the cast roof, I cut a sheet of platicard to the correct size and added a bead of quarter round around the edge to hold the roof in place when it is glued to the roof section.


Here is a better view of this work and the detail on the walls.


I had drawn an ellipse on a sheet of 4mm thick plywood and cut it out using a scroll saw. This would be the base for this large model.


I had some small walls which could be put around the base.

They were originally straight sections but I bent them to shape by holding them in just boiled water and bending to shape. When I had them how I wanted I dipped them in cold water to hold their shape.

This gave me a surrounding wall but it was a little short in height so I used each section of wall as a profile and cut out plywood sheet packing to cut out with the scroll saw again.


Well that is the end of this part. Next the surrounding wall has to be fixed in place and will look into the difficulties of fitting the roof squarely and adding some more detail.

Aegean/Mediterranean Harbour Scenery Part One

Hello There! Along with the modular terrain and the Walled Vineyard I have also started a harbour for the above.

This can be used for the Aegean and 20mm figures and also Napoleonics in 28mm.

This is based on the Wargames Illustrated Feature, 'Operation Nostalgia' which was in issue 74 in November 1993.


This is the basic shape. After drawing a plan of the proposed design I measured out a 600mm x 600mm scenic tile.

I had drawn out the layout of the harbour and used some timber I had stored in the garage, 'in case I ever needed it'! I cut it to size, using a cross cut saw,
 
I then made sure the surface of the floor of the harbour was all the same height by using some thin off cuts of styrofoam glued in place using non solvent gripfill.

The tool on the left of t he picture is a Stanley Surform. It is a hand held plane which is perfect for moulding styrofoam. It makes a big mess but is easily hoovered up. It enables you to mould the styrofoam and be more precise with your meausrements.


The block and brick work for the harbour walls and floor are from a railway model supplier called Slaters Plasticard. They supply many different scales and size if brick and block work.

I found it difficult to keep the steel rule in place while cutting the sheet to size so devised a system to hold the ruler in place which I had hands free to cut the sheet accurately.

I used a quick release clamp to held one end of the ruler in place while cutting and was able to keep my fingers out of the way while cutting.


I planned to represent a number of large timber logs to fit next to the wall as retaining and a way to protect the wall against careless fishing boat captains who could hit the wall while mooring. I also wanted a length of timber along the corner of the wall and floor of the harbour.

Both of these would be made from plasticard, scored with a suede brush and then marked with a wood grain with a sharp No 11 scalpel blade.The plastic strip is the start of this.

Also the foam and plywood sandwich is the start of the boundary wall of the harbour. This will be covered in air drying clay later.

On the left hand side is masking tape holding the Slaters plasticard on to the sides of the harbour walls.

This is the end of part one and in the next part I hope to complete the plasticard cladding and add a couple of extra features.