Showing posts with label Commission. Show all posts

Wednesday, May 22, 2024

10mm Buildings Commission

Hello There. I have had the opportunity to complete another piece of work for a wargaming friend and colleague.


First up two further gun emplacements. These are undercoated, painted, washed and dry brushed.


These are the first 3D printed items I have painted. They sit on bases that I made after I cut out the bases and fitted acetate windows.


Returning to resin buildings this small church and water mill were full of detail.


These are the finished Items I mentioned in an earlier post. I feel the replacement roof looks better than the original!

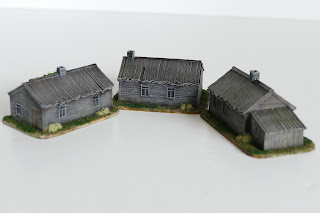
Lastly the resin items were representing all timber construction. I tried to avoid the 'brown' that you get with some representations of wooden buildings. If you look at your garden fence, taking into account that they are pressure treated and/or painted, they always fade to a grey which can become quite dark.

These all require varnishing which shall be done when the weather is less humid!

Sunday, April 14, 2024

10mm Buildings for Napoleonic Russia

 Hello There! With a couple of on going commissions going on while I have been moving house for the third, nearly fourth, time in two years, it has been difficult to make much progress on this work.

One part of my latest commission includes a mixture of 3D print and resin cast 10mm building which will be seen on the 15mm Napoleonic table of a friend of mine who lives in Norfolk.

I had airbrush undercoated two of the 3D print models to find that either the paint was too thick or I had over sprayed too much.

On using Modelstrip to remove the paint I found that the paint stripper had removed some of the detail of the underlying model. There was not too much detail on the roof in the first place but this was now unacceptable.

I used Milliputt to return the detail to something I feel was better than the original.


Here is the original on the left and the refurbished version on the right. The loss of detail on the stripped roof was very noticeable and the new result is a great improvement

Sunday, August 6, 2023

Total Battle Miniatures Commission

Hello There! A small post to show the latest commission I have completed for a friend. These are 10mm model buildings from Total Battle Miniatures.

The buyer uses 15mm figures but due to the large footprint of 15mm buildings in relation to the figure scales used he uses building of the next scale down.

The range of buildings uses a latex bases to represent villages or towns. The buildings and bases are modular so can be switched easily.


Wednesday, April 26, 2023

Trees, Latest Work in Progress


Hello There! After a hiatus that was far too long I have been asked to supply these to a fellow wargamer. I had already sold my existing stock and then had another order!

These are Woodland Scenics armatures which are glued to two pence pieces. The milliput is wrapped around the trunks to strengthen the tree and then scored with dental tools. 

Then some tacky glue then sticks ant clump foliage to the armatures and a liberal soaking of PVA and water which makes the foliage solid.

The PVA and water soaking does take a while to dry solid and any bits that fall off can be superglued back on when the PVA has dried. There are no joins to see and the subsequent airbrushing hides and superglue residue.

After that an airbrushing, flock the base and we are done!

Wednesday, March 24, 2021

Reconditioned Hex Terrain Rock Faces.

Hello There. I have completed a commission for a friend which is some of the last hex terrain I have to recondition for him.


The three hex terrain tiles were originally representing high ground but had no rock face. They were typical of the hex terrain available from the 1980's onwards. I covered the raised areas in styrofoam off cuts and after glueing them on with gorilla glue, or polyurethane expanding adhesive, I let it dry and carved the exterior to match up between the tiles.


The styrofoam was carved to match up between tiles. When I was happy with this I took a sharp scalpel bpade and carved the basic corrugated shape. I wanted the face to be irregular but also the separate layers of the styrofoam to be disguised so that the layers of foam board could not be seen. 


Once this was done I then ran the sharp scalpel blade paralell to the ground many times to form the geological layers in the rock faces. Every now and then this cut small piecs of the foam face free of the board but this is not a problem as the irregularity of the paralell cuts makes the frock look more realistic.


Then paint the whole face in black. As there are many recesses in the rock face I added some water to thin the paint and some washing up liquid to break the surface tension of the paint and water. This allowed the paint to better permeate into these recesses. I found that spending a long time under a strong light led me to miss many spots here and there and tell tale bright blue styrofoam would poke through here and there. I had to take a break until my 'paint gap blindness' went away.


Once I was sure this had all been covered in black I then heavily dry brushed the rock face surface in dark grey and progressively lightened the grey and made the dry brushing more subtle until you reach a very slight dry brush in just white. This process picks out the subtle gaps and spaces in the rock faces.


Here is the last remaining half tile to show what I had started with. This system of dry brushing can be used with different colours. Sandstone cliffs are various shades of brown so that could also be used.


The sample figures are 28mm Perrys ACW Confederate infantry and a mounted Union Colonel from Old Glory for scale.

Wednesday, September 25, 2019

Windmill

Hello There! On a short visit to the wargames club I spotted a windmill I had completed for the club as a commission. I had not seen it for a while so took some snaps for this blog.


All scratchbuilt using plasticard for the roof and walls and the sails came from Warbases after I provided some dimensions. I found this company very helpful and reasonable on price for a bespoke item. The rest of the sails are covered with tissue soaked in thinned PVA and tied in place with thread.